So you’re just trying to install or update Java and then you’re prompted with java error code 1603 and you’re stuck you don’t know what to do next? Or maybe you’re trying to install java based applications and suddenly encounter this error pops up? Whatever the case might be, we’ll address the error code 1603 in this post and how to fix it fast.
This java error is very common, the error code 1603 java normally indicates that the application you’re trying to install already exists. If you’re updating java, it can also mean the update pack was already installed.
Causes Of Java Installation Error 1603
- Network Interruption.
- Java registry is damaged.
- A program or application on your PC is causing problems for the installation process.
- You have a damaged java program on your computer.
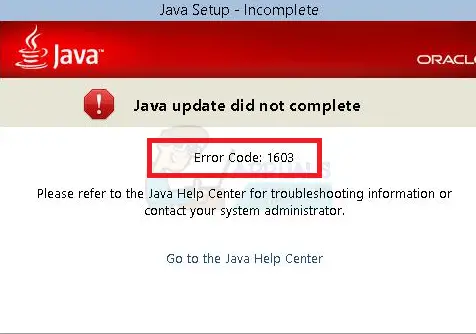
Error Code 1603
How To Fix Java Installation Error Code 1603
Before proceeding with any troubleshoot there are a few things you would like to check and might help you fix the java error 1603 very fast. Let’s take a look at them:
- Restart your pc to refresh settings.
- Ensure that you’re running a java installer as Administrator.
- Make sure the installation drive isn’t encrypted.
- Make sure you have provided permissions in your security software.
- If you’re using BitLocker, you need to disable it.
Once you’ve checked the information above, you now proceed with other troubleshoots to fix the java error 1603.
Check compatibility
It’s possible that the java you’re trying to install isn’t compatible with your Windows Version. This mostly happens for Windows 10 users. First, you want to check for the requirements of the Java package you’re trying to install. Secondly, you should check your Windows 10 version to see if it’s the compatible version stated in java requirements. You can check your Windows version by following these steps:
- Head over to “Settings” by right-clicking on the Windows icon from the toolbar.
- From the Settings menu, you should select “Systems”.
- Then you click on the About Tab.
- This is where you can see details about your system hardware and software type and you can see the version of Windows under “System type”.
- You can now confirm whether it’s the right version for Java or not.
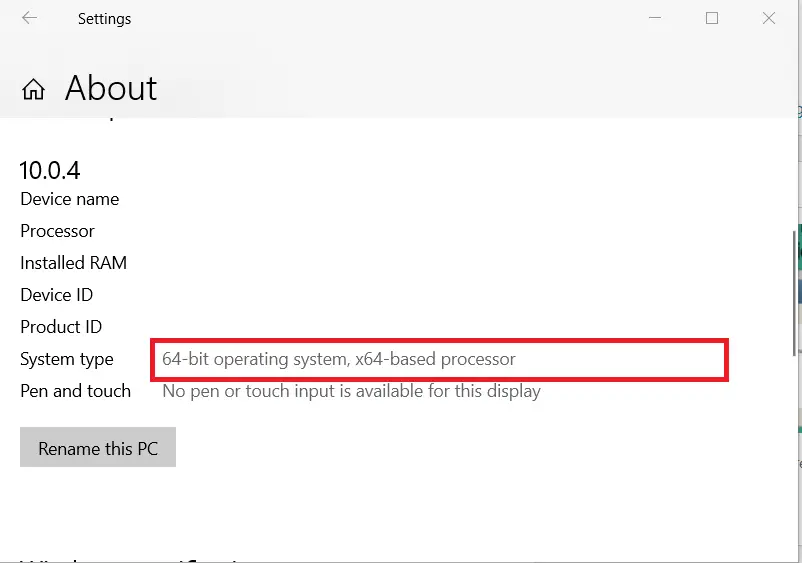
Check Compatibility Windows 10
Close your browser and all java programs
When your browser or Java programs are running they can interfere with Java installations, and closing these programs can help you fix the java error 1603. Start by closing your web browser and then java programs. There are Java programs that can run in the background and you need to close them as well. Here is how you can do that:
- Open Task Manager by right-clicking on the taskbar and then selecting “Task Manager” from the options.
- Click the Processes tab where you’ll find the list of all programs. You should disable all java programs, or you can close any app running. Also, in the error message some programs might be mentioned that are causing the java error 1603, you should make sure they’re closed.
- You can now continue with your Java installations and see if the error is fixed or not.
Disable Antivirus programs
Antivirus programs like firewalls can block Java installations and that’s why you need to temporarily disable any Antivirus program you’re using on your PC. You can turn off your Antivirus program by going to settings where you’ll see the option to switch On or Off. After that, you should check to see if the java error 1603 is gone. If the error is gone, you then have to provide permissions for Java and every Java program on your PC, or you can just switch to another Antivirus program.
Disable java content
- Open Control Panel on your Windows PC, just use the search box or right-click on the Windows logo, the control panel will be shown to you.
- You should set to view the items by “Large Icons”.
- Java should be included in the list and you need to select that.
- Inside the Java Control Panel, you’ll have the “Security” Tab and need to click on that.
- You’ll see the option “Enable Java content in the browser”, this option is checked, you need to Uncheck the box to disable it.
- Hit the Apply and OK buttons to confirm your changes and then close.
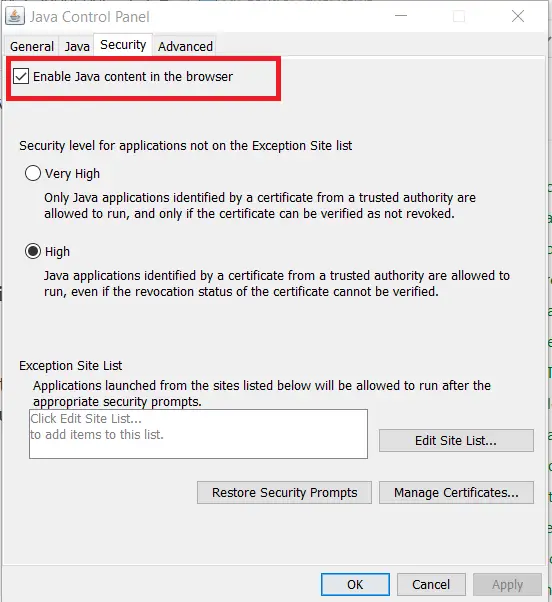
Disable Java Content
Remove previous Java versions
If you’re trying to install the latest version of java and you already have the old version, you need to Uninstall and then add new installations to your PC. Here is how to do that:
- Open the control panel as you did above and also select “View large icons”.
- You can see “Programs and Features”.
- After clicking, you can view the list of installed programs on your PC, locate Java in the list, and right-click. You can see the option “Uninstall/Repair”. Click to Uninstall.
- You can now install Java again and hopefully, you won’t encounter the java install error 1603.
Check our article to find how to silent uninstall old java
Install Java as the administrator
It has already been stated that the error can be received when there are no administrator permissions and in order to fix that, you need to run the installation as an administrator. To do that, just right click on the Java installer and select the option “Run as Administrator” from the context menu. The Setup Wizard will now launch with administrator permissions.
Use install and uninstall troubleshooter to fix the error
Windows has a tool called Install and uninstall troubleshooter. You can use this tool to remove the java install error 1603. This tool isn’t pre-installed on your Windows PC, you’ll have to download it. Just search for the tool online or you should head over to Microsoft Official website to download. Once installed, you should launch the tool and it will identify the problem that is preventing you from installing or uninstalling programs on your PC.
Don’t use LogMeIn
If you’re using remote desktop software like LogMeIn, you have to ignore using such software. Users that are using this software report having problems while installing Java. Discarding the software can fix the problem. You should also do the same if you’re a LogMeIn user.
Remove KB2918614 Windows update
Removing the KB2918614 update has also helped some users fix the java install error 1603 on the Windows Pc. Here is how to remove this updated package:
- Open the Run dialog by pressing Windows + R keys.
- Type cpl in the box and click OK or hit Enter.
- In the Window that opens, which is the control panel manager, you can see the option “view installed updates” on the left pane.
- There is a search box, you need to type KB2918614, this update will show up and you need to click on it and then hit the uninstall button.
- Restart your computer and check to see if the error is gone.
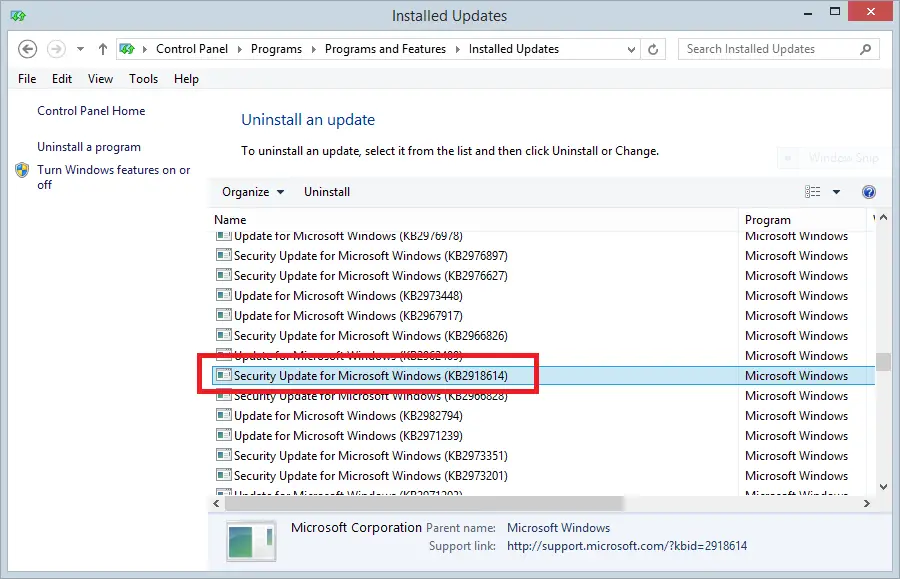
Remove KB2918614 Windows update
Use offline Installer
If you’re using the online installer and you haven’t get rid of the java install error 1603, try using the offline installer. Before doing that, you should make sure that every Java component has been removed. Search for “java offline Installer” on java official website, or you can download from third parties online. Run the installer as administrator and wait to see if the error is fixed.
Install Service Pack
Older versions of windows like XP, Vista, and even some versions of win 7, are receiving this error because they have old Windows Service Pack. The error can show up on systems that are older than Service Pack 1. You should make sure you have at least Service Pack 1 or newer versions and you can search for these packs on Microsoft official website.
Conclusions
This is all about the ways to troubleshoot and fix Error Code 1603 during java installation.
