The File Explorer or Windows Explorer is the best built-in application to organize and manage your important files & folders on Windows. However, it has occasional moments of failure that make it difficult for you to access your files. Apart from the app crashing problem, File Explorer not responding is another common issue you may encounter, considering how extensively File Explorer is used. But, you can quickly fix these problems.
Read on to understand why the issue shows up frequently and different ways to resolve it.
Reasons for File Explorer not responding
No matter which version of Windows you are running, there are high chances that you will receive the error message “Windows Explorer has stopped working. Windows is restarting.”
Further, slight flickering often accompanies the error message.
But why? You must have wondered!
Here are the most common causes of the File Explorer not responding error message.
- Other applications or programs on your system are interfering with the File Explorer
- A virus or malware attack
- Corrupt, damaged, or incompatible system files
- Outdated video driver
- Lack of sufficient space on the PC
- Change in the display settings, such as font size
- Clogged File Explorer history
All these cause your File Explorer to not respond to any commands. Let’s now work around the basic fixes to solve the Windows File Explorer not responding problem.
How to fix File Explorer not responding?
Here are the top 11 fixes that solved the File Explorer not responding error on my system and will solve on yours as well.
1. Restart Windows Explorer
- Restart from the Task Manager
- Restart via Command Prompt
- Restart with a Batch file
2. Clear File Explorer’s clogged history
3. Extend system partition if it is full
4. Set the display settings to default
5. Check and free up space on your system drive
6. Change the size of text and apps to 100%
7. Find the root cause of the problem with Event Viewer
8. Reset program and file associations to default
9. Perform a Netsh Winsock reset
10.Run the SFC tool
11.Update Windows 10 to the latest version
Before starting with any of the above solutions, I recommend restarting your computer. Once the system restarts, begin with the first solution.
1. Restart Windows Explorer
The File Explorer not responding problem can be easily solved by restarting the Windows Explorer (explorer.exe). Now, there are three different ways to do so.
A. Restart from the Task Manager
To restart Explorer from the task Manager, follow these steps.
- Launch Task Manager on your system. You can do so by using the shortcut key combination Ctrl+Shift+Esc. Alternatively, enter Task Manager in the search box and hit the Enter
- Once the Task Manager opens, go to the Processes tab from the menu bar.
- Look for the Windows Explorer option and click on it.
- Click on the Restart option at the bottom right corner of the screen. You can also right-click on Windows Explorer and select Restart from the drop-down menu.
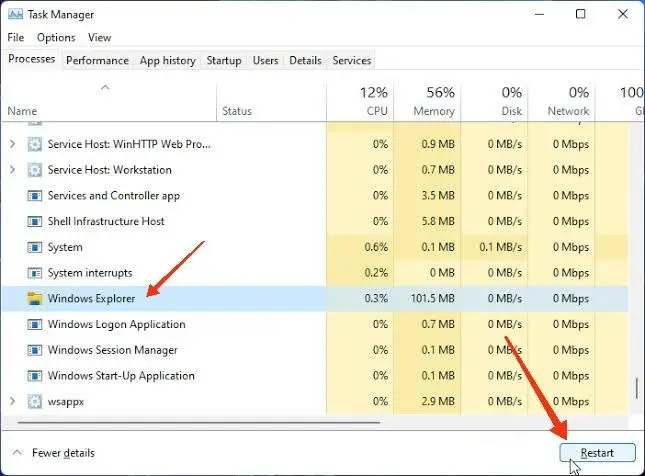
Restart Windows Explorer
The Explorer will restart now. Note that things such as your Start menu and Task Manager will disappear for some time. However, they will appear back when Windows Explorer turns on.
Check if the problem persists. If yes, restart explorer.exe via the command prompt.
B. Restart via Command Prompt
Restarting Windows Explorer on Windows 11/10/8 is very straightforward as discussed above. If you are getting Windows explorer not responding on Windows 7, the steps are a little different.
In Windows 7, you will have to first end the process and then, restart it.
Follow these steps to do so.
- Launch Task Manager on your system. You can do so by right-clicking on the space on the Taskbar and selecting Task Manager from the menu.
- Once the Windows Task Manager window opens up, click on the Processes
- Select exe and click on the End Process option at the bottom.
- A pop-up box will appear stating – Do you want to end ‘explorer.exe’? Click on End process.
Now, it’s time to restart Windows Explorer. Although Windows will restart after a minute or so, you can restart it manually through these steps.
- In the same Windows Task Manager window, click on the Files tab and select the first option, i.e., New File (Run…).
- This will open the Create New Task In the input field, enter explorer.exe and click on OK.
Your notification area and taskbar will reappear and the earlier Windows File Explorer not responding problem must have been fixed by now.
C. Restart with a Batch file
If the above steps seem confusing to you and want to avoid the Task Manager to restart Windows Explorer, I recommend using a Batch (.bat) file.
To do so, follow the given steps.
- Open any text editor such as the Notepad on your system.
- Copy-paste the following three lines in the empty space.
taskkill /f /IM explorer.exe
start explorer.exe
exit
- Click on the File tab and select Save As.
- Enter any name with the .bat extension in the File name area and select Desktop to save the file on.
- Click on Save to end the process.
Once you’ve created the file, you just need to click on it to restart Windows Explorer.
2. Clear File Explorer’s clogged history
The File Explorer not responding problem can easily be solved by clearing its history. To do so, follow these steps.
- Enter the file explorer option in the search box and hit the Enter
- As the File Explorer Option window opens up, go to the General
- In the Privacy section, tick all the checkboxes and click on Clear.
- Click on OK.
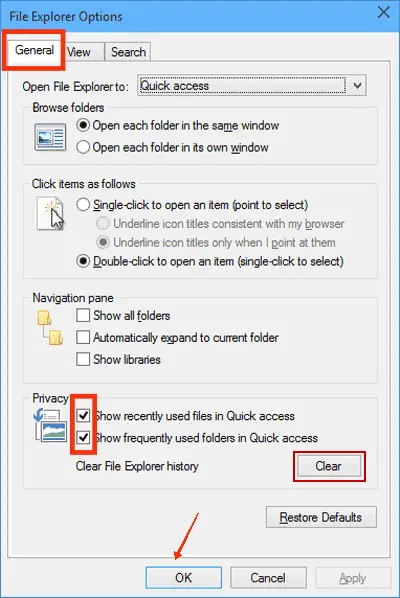
Clear File Explorer’s clogged history
You have successfully cleared the history of File Explorer. I recommend clearing the history regularly to avoid any sort of issue in the Explorer.
3. Extend system partition if it is full
If the system partition is full, you’re more likely to face the Windows File Explorer not responding problem. Additionally, slow app speeds and other failures also arise due to insufficient C drive space.
In such a situation, you’d try extending the C: partition and this will serve you with the following benefits.
- Access to more space currently unused by other partitions
- Faster system speed
- Optimized PC performance
To extend the system partition on Windows 11/10, follow these steps.
- Hit the shortcut key combination Windows + X and select Disk Management from the menu that appears. Alternatively, you can type Disk Management in the search box and hit the Enter
- Once the Disk Management window opens, right-click on the D partition and click on Delete Volume from the drop-down menu.
- A Delete simple volume pop-up will appear. You have to choose Yes.
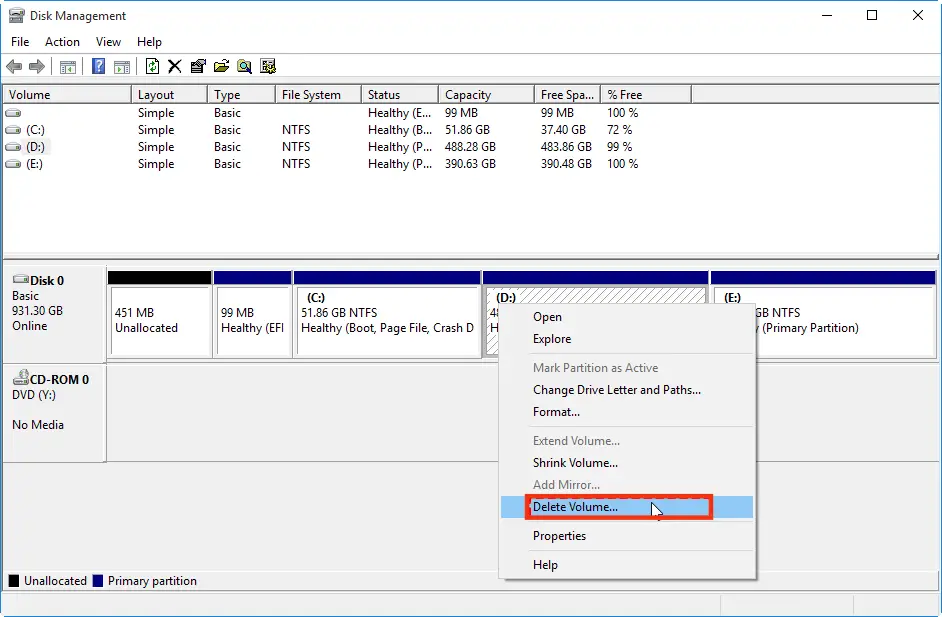
Extend system partition if it is full
The above steps will delete the D partition. Continue with the next steps to extend the C partition by merging it to the space left by the D partition.
- Right-click on the C partition and click on Extend Volume… from the drop-down menu.
- The Extend Volume Wizard will open.
- Click on Next> and follow the on-screen instructions.
By default, the whole D partition space will get merged with the C partition if you don’t specify how much space to merge.
Restart the computer and check if the Windows Explorer not responding problem is solved or not. If not, try the next method.
4. Set the display settings to default
Have you recently changed the display settings on your Windows 10? If so, that’s another reason behind the File Explorer not responding. To sort it, you’d have to reset the display settings.
Unfortunately, there’s no straightforward option to do so.
However, these simple steps would work.
- Go to the Settings.
- Click on Personalization.
- Select any desired display setting – theme, color, or text size by checking the checkbox beside them.
- Select Customize.
- Click on Restore Default.
The selected display setting will be set to default.
5. Check and free up space on your system drive
Your hard drive stores numerous things you download on the PC. No matter how much storage capacity it has, it’s bound to get short of space and give rise to various problems.
Hence, it’s recommended to monitor your drive space and keep it free from unwanted stuff to effectively manage space for essential things. Here are the steps to check space on your system drive.
- Open File Explorer.
- Click on the This PC option on the left side panel.
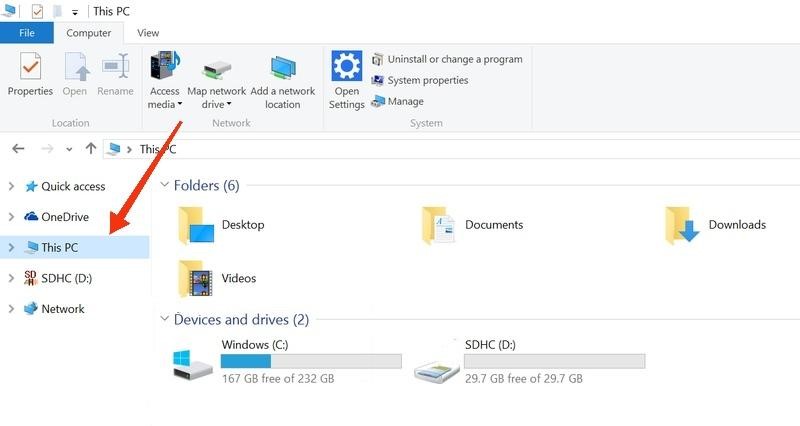
Check and free up space on your system drive
- Under Devices and drives, you’ll find your C drive, its total storage, and used/available space.
I recommend having at least 60% unused space on the drive for the system’s optimal performance.
If you’re running out of space, try the following hacks to free up drive space.
- Uninstall unwanted apps and programs
- Clean unnecessary stuff from the Desktop (keep Desktop clutter-free every time)
- Delete all heavy files or folders
- Move temporary files to the recycle bin
- Start saving to the Cloud
Once you have sufficient space, you should not get the Windows 10 explorer not responding error message.
6. Change the size of text and apps to 100%
To change the size of text and apps to 100% on Windows 10, follow these steps.
- Go to the system’s Settings.
- Search for the Ease of Access option as shown in the image. Click on it.
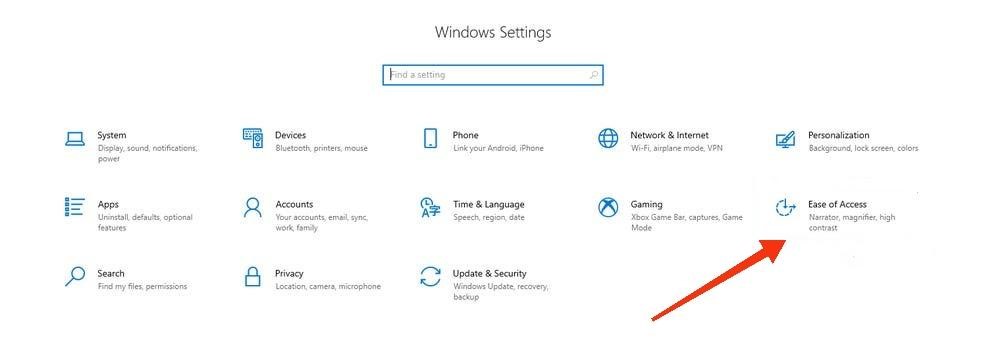
Change the size of text and apps
- The Ease of Access window will open up. Go to Display from the left sidebar.
- Under the Make everything bigger heading, make sure you have set 100% (recommended) for the text and apps size on the main display. If not, change it.
- Click Apply to apply the changes.
The text and app size should have changed to 100% on the main display. You can also change the size on other displays from the Change the size of text and apps on other displays option.
7. Find the root cause of the problem with Event Viewer
Microsoft Event Viewer is another powerful app to find the cause of File Explorer not responding and solve it immediately.
To use Event Viewer, follow the given steps.
- Open the Run command box.
- Type msc in the input field and hit the Enter key. The Event Viewer window will open.
- Click on Windows Logs to expand it. Select System from the list.
- Click on Error from the System’s window and you’ll get the cause of the error under the General
- Once you’ve found the error and its cause, proceed to resolve the error by working around the cause. For example, if it’s due to any third-party app, uninstall it.
Now, check if the Windows Explorer not responding problem persists. If so, try the next method.
8. Reset program and file associations to default
To reset your program and file associations to default in Windows 10 or 11, follow these steps.
- Go to Settings or press Windows + I keys
- Go to Apps and select Default apps.
- Scroll down to the Reset
- Click on Reset and then, click on OK to completely reset all the apps.
9. Perform a Netsh Winsock reset
If Windows Explorer not responding error still haunts you, I recommend performing the Netsh Winsock reset. Follow these steps to do so.
- Launch Command Prompt as admin.
- Enter the command – netsh winsock reset and hit the Enter key.
- The above command, upon execution, will return with the following message.
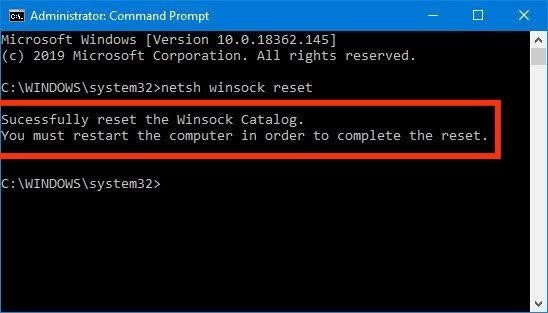
Perform a Netsh Winsock reset
- Restart your PC to see the results.
Although there are no restrictions to using the Netsh Winsock reset, don’t do it more than a few times throughout the life of your PC.
If you need to use it multiple times, there are chances of a major problem with your PC.
10. Run the SFC tool
The SFC tool or System File Checker is the best and most commonly used tool to check and fix a wide range of PC issues, including the Windows 10 explorer not responding.
Follow these steps to use the SFC tool.
- Open the Run command box through any method you are comfortable with.
- Type cmd and hit the shortcut key combination of Ctrl+Shift+Enter to open Command Prompt as an admin.
- Once the Command Prompt opens, type sfc /scannow and hit the Enter
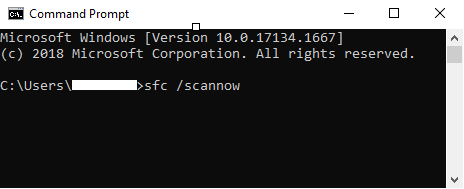
WerFault Error sfc scan now command
The SFC tool will examine the system for all possible issues and fix them automatically for you.
11. Update Windows 10 to the latest version
To update your Windows 10 to the latest build, follow the given steps.
- Go to Settings.
- Look for the Update & Security option and click on it.
- Click on the Windows Update
- Next, click on Check for updates. If there will be any update available, it will be automatically downloaded.
So, these are the 11 solutions for the File Explorer not responding on Windows 10 problem.
Conclusion
So, here you go. These are the 12 best fixes to solve the Windows File Explorer not working problem. To ensure you don’t face the problem again, I recommend keeping the File Explorer history clear and the Windows version updated to the latest build.
Also, restore the default display settings to keep the File Explorer from crashing in the future. Do try the above fixes and let us know which method worked for you in the comments below.

