The purpose of this procedure is to instruct users how to create a new archive email Outlook 2013 and make it easily available in the program. Your email is stored in a pst file. To archive email, we will be moving the email into an archive pst file
Archiving is performed for several reasons:
- Your Mailbox is configured to hold a certain amount of email and after exceeding the limit, your email is not functional.
- Archiving them on partition D in order to save them when the Windows system is out of function.
NOTE: When you archive your email into another pst file, all the email you choose to archive is moved into the archive file and is no longer available in the main .pst file.
Step by Step Process of New Outlook Archive
Step 1: Creating new archive email Outlook 2013
To begin archiving your email, click the “Folder” tab on the ribbon then click on Auto Archive Settings:
Step 2: Auto Archive Settings Outlook 2013
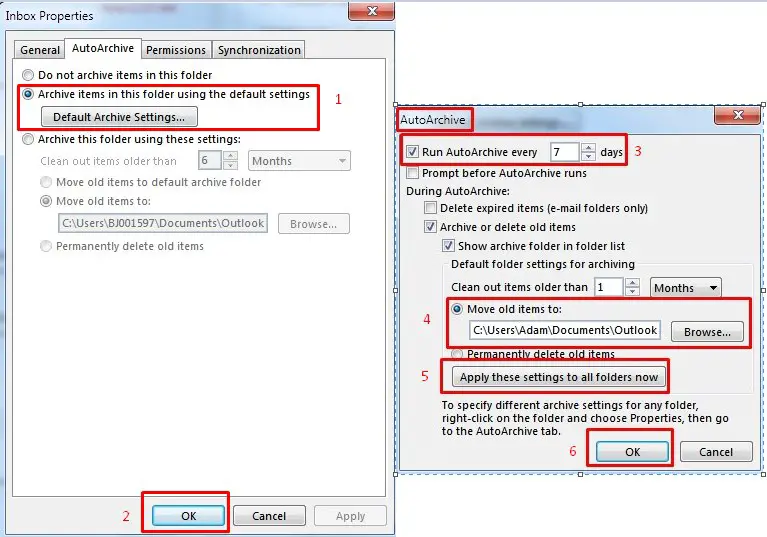
In the following pop-up windows we can setup Auto Archive Settings by clicking on Default Archive Settings after we have created new archive email Outlook 2013.
After that we can activate Run Auto Archive and based on our need we can setup the number of days
- Delete Expired Items (E-mail Folders Only) box should be unpaired / unchecked.
- In the option Older Clean out Items we recommend to setup maximum 1 month
- You should select the option Move Old Items To. Click the Browse option to create and save the your .pst file. You can select the folder where your archive will be stored. For uniformity, select Data D : (or simply D on some computers; if your computer does not have drive D select drive E but we recommend not to select local disk C.
- You can leave other options as in the window below
- Click Apply these settings to all folders now and then OK and again OK.
Step 3: Microsoft Outlook 2013 Auto Archive
In these step we are going to auto archive all the mails in the new archive email Outlook 2013 just created:
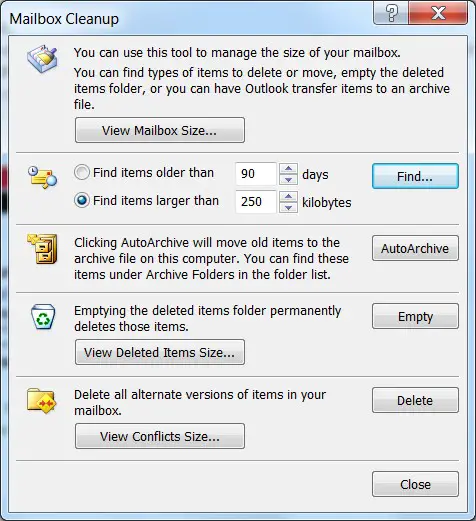
Click File – Info – Cleanup Tools – Mailbox Cleanup and click Auto Archive. You need to wait a few seconds and you can see the new archive email Outlook 2013 on your left side
Step 4: Change the name of the new archive email Outlook 2013
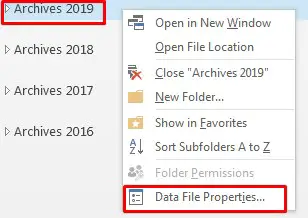
To change the name for better identification, right-click on the new archive email Outlook 2013 created, go to Data File Properties:
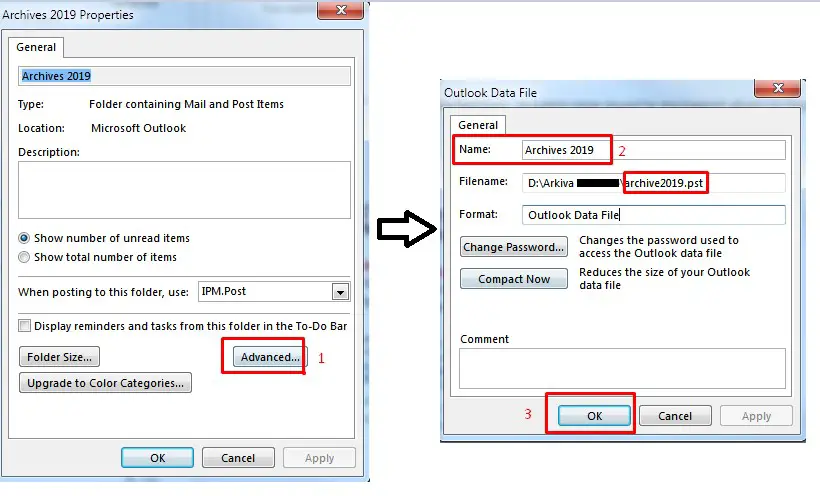
Click into Advanced. Change the name to the “Name” field, for example Archives 2019. After you enter the name, click OK.
Step 5. Update modifications in the new archive email in Outlook 2013
If you create a new folder or new subfolder on a specific folder in your mailbox during your work, for the reason you have to open the AutoArchive window by following again the steps above. Click on Folder – Auto Archive – Default Archive settings, then press the Apply these settings button to all folders now, then the OK button and again OK.
You will need to do this for each new folder or subfolder that you will create during your work. As you can see, this applies to both those who have created Archive Folders and those who are creating it now.

