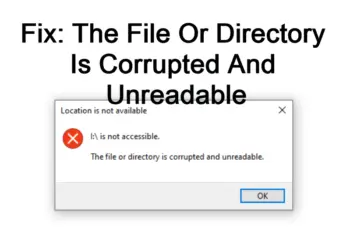
Critical_Structure_Corruption Stop Error On Windows 10 is an error that shows up when your computer crash or shows a blue screen. You’ll experience unexpected shutdown when such error is displayed. The Critical Structure Corruption error shows up when the driver you’re working with tweaks kernel data or when your hardware is out-of-order. Some of the factors that cause this situation include corrupted memory card, faulty hardware and other pc problems.
Whatever the case might be that you’re receiving this error message, in this article we’ll outline all the possible solutions to this annoying windows 10 error. Stay with us till the end to learn more about this critical error and how to fix it.
Understand and Fix Critical_Structure_Corruption
Possible Causes Of Critical Structure Corruption Windows 10
- When there is a faulty hardware such as corrupted memory drive, getting rid of the hardware is the best solution.
- Defective Kernel code.
- When there is a faulty driver running on your operating system, updating or reinstalling the driver will take care of the problem.
Now let’s take a look at the actionable steps to take in order to fix the problem.
Here are some workarounds before you start troubleshooting the problem of critical_structure_corruption in windows 10!
Before you start troubleshooting the problem there are simple actions you need to take that might save your time and fix the problem fast before going through a lengthy process. Let’s share these workarounds:
- The first thing you want to do after receiving this error code for the first time is to reboot your system, and if you’re lucky, you might get rid of the problem, especially if it’s due to temporary error that arise in your PC.
- If you receive the error often, you want to check and install new windows updates, most drivers won’t function properly without the latest windows updates.
- Remove any external drive attached to your computer, restart your computer and see if things are working.
- Check to ensure all power connections are alright, especially PSU, check for faults and fix.
So after taking these few steps and your problem isn’t solved, you now proceed and apply the fixes we’ll outline below.
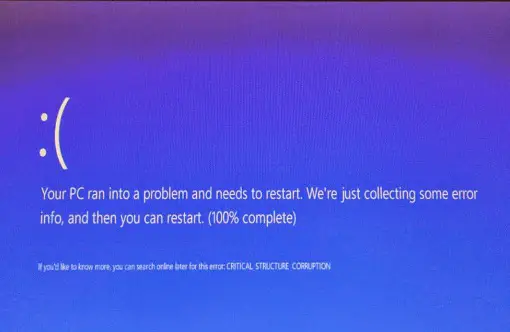
critical structure corruption
How To Fix Critical Structure Corruption Windows 10
1. Check computer hardware
This is the first thing you want to check in order to get rid of this problem and the major ones to check are Hard drive, RAM and PSU.
Check RAM: this can be analyzed using the Windows Memory Diagnostic Tool. it’s a build-in tool in Windows 10 that allows you to find and fix RAM errors. Just search for “Windows Memory Diagnostic tool on your PC” and you’ll be taken through the process.
Check PSU: for this you need to ensure all cables are connected properly, especially if you’re attaching external drives and also ensure your hardware doesn’t exceed limits of power supply.
Check hard disk: your hard drive should also be checked using the CHKDSK command. Here is how to do it:
Open Cortana/command prompt by typing cmd in the box.
- Right click on ‘cmd’ that shows up.
- When the command prompt open, you should now type ‘chkdsk *: /r, and press enter.
- This action searches for errors on your hard drive and attempt to fix them all.
- If your hard drive is physically damaged, then this scan won’t be of any help, you have to replace your hard drive to get rid of the problem.
2. Run Blue Screen Troubleshooter
Windows come with another effective that will help you solve critical_structure_corruption win 10, you need to run this tool and see if it can get rid of the problem. Follow these steps to launch Windows update troubleshooter:
- Go to settings from the start menu, click on ‘update and security’ and then Troubleshoot.
- Scroll down to find the option ‘find and fix other problems’ and select ‘Blue screen’ option.
- Click on ‘Run the troubleshooter’ to begin the process.
- Wait for the process to end and after that restart your PC to see if the problem is gone.
3. Run SFC scan
Here is how to run the SFC scan:
- Search for ‘cmd’ in windows search box.
- When cmd shows up, right-click and select run as administrator.
- A command prompt windows will open and you need to type ‘SFC/SCANNOW’, without the quotes. Press enter to begin SFC scan.
- Wait for the process to finish 100% and see if the problem is solved. SFC scan will look for errors that are causing the problem and then attempt to fix them automatically.
- Restart your PC
- Check if the error is still there.
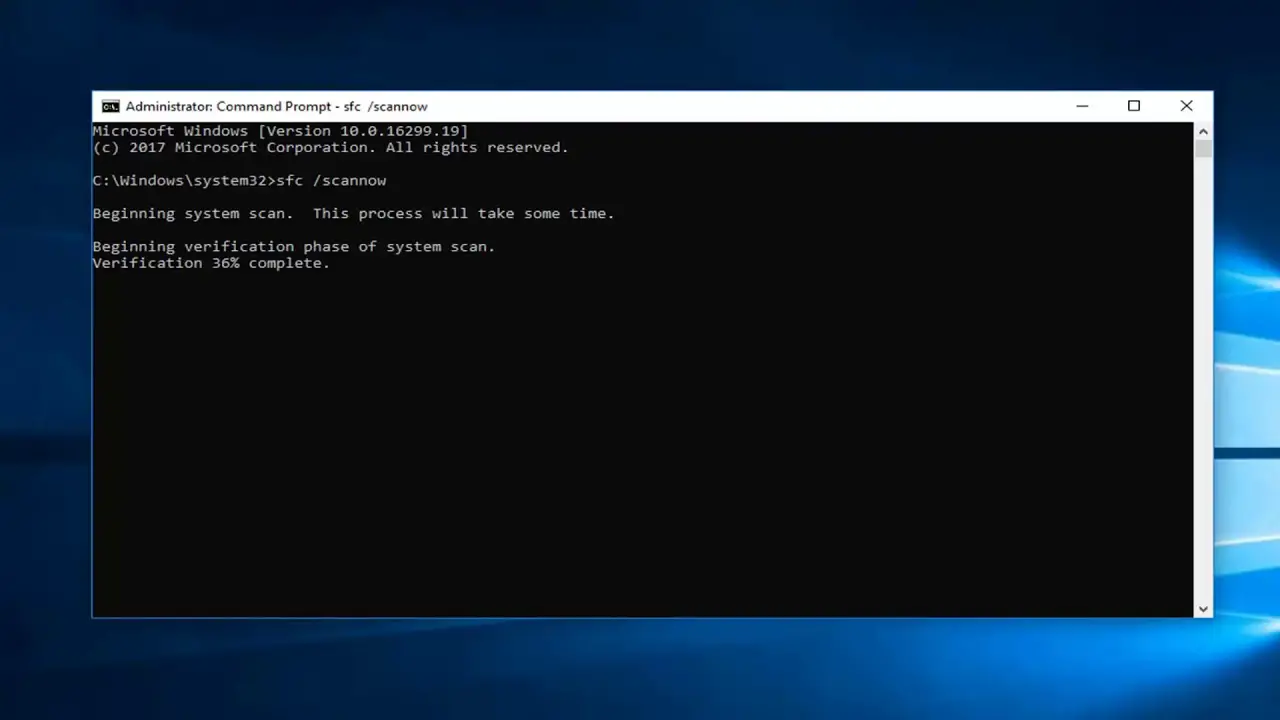
Run System File Checker
4. Run clean boot
If you haven’t remove the error, you need to run clean boot. This will help you find faulty driver that might be causing the problem. Here is how to do that:
- Open the run dialogue by pressing Windows + R key on your keyboard.
- Type ‘msconfig’ in the box dialogue and click Ok.
- In the list of services, you should look for the option ‘Hide all Microsoft services’, and check the box next to it.
- Now you move on to ‘startup tab’ and click ‘Task Manager’ option.
- You should go through all the items and disable them, when you right-click, you’ll see the option to deactivate.
- Close task manager and press Ok to apply the changes and also exit the startup tab.
- Restart your Pc and check.
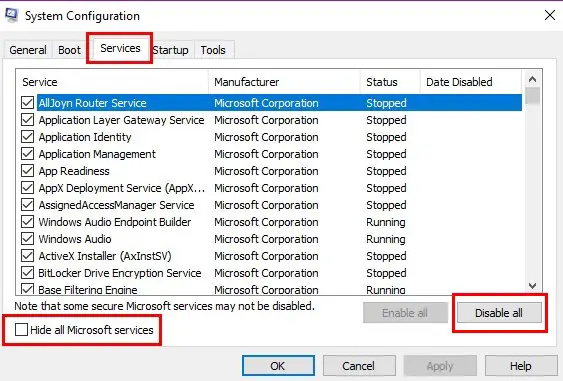
Run Clean Boot
5. Update Video Driver
- Go to windows search box and type “Device Manager”.
- Click on the ‘device manager’ option when it appears.
- In the list of drivers, search for ‘video driver’ and right-click on it.
- From the options, you should select ‘update’ option, this will check for updates if available and install them. you should be connected to fast internet in order to speed up the process.
- Restart your computer when its done.
6. Check Event Viewer
Follow these steps to check even viewer:
- Type ‘event viewer’ in windows search box.
- The Event viewer will show up and you need to click on it.
- You need to expand windows option which is at the left pane.
- You’ll notice ‘system option’ and all systems running will be listed, find the system with errors or the ones that are running when the error occurred and pause them.
- Restart your pc. Check if problem is resolved.
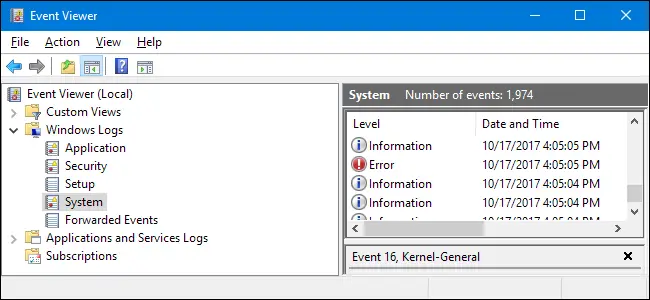
Check event viewer
7. Uninstall display driver
Display driver can cause blue screen and uninstalling it can get rid of the problem. Here is how to do that:
- Press Windows + X key, ‘Device Manager’ will show up and you need to open it. you can as well open ‘device manager’ from any other short cut you might have, like searching in windows search box or right-click from task bar.
- In the list of devices, you should locate ‘display adapters’, click on it to show display more options, right-click on the ‘graphics driver’ you’re using and select uninstall. Your graphic driver will be installed again in the next step.
- When it’s removed, you close the device manager and restart your Pc, when your computer is restarting, a new driver will be installed and if that’s the cause of your problem, it will be solved by following these procedures.
8. Uninstall programs that might be causing critical_structure_corruption
There are programs that are known to cause this error on windows 10, you have to remove these programs and see if problem is solved. Here is the list of programs that are known to cause critical_structure_corruption error on windows 10:
- VirtualBox
- Deamon Tools
- Intel Hardware Accelerated Execution Manager
- Alcohol 120%
- Bluestacks
- And other android Emulators
If you have any of these programs or related to them on your Pc, you need to uninstall them and see if the problem is fixed. Here is how to do it:
- Open control panel.
- Click on ‘programs and features’.
- Locate the programs you suspect are causing the problem.
- You should also take a look at your new installations immediately before you start experiencing the critical structure problem.
- After uninstalling a few programs, you should restart your PC, if your PC is now working smoothly, you need to install the programs one by one, and then restarting your Pc, so that you can identify the program causing the problem.
9. Run Driver verifier
Running driver verifier can fix most driver problems on your Pc that’s causing the critical_structure_corruption windows 10. Here is how to run the Driver Verifier:
- Open the Run dialogue by pressing Windows + R key.
- Type ‘sysdm.cpl’, hit enter or press ok.
- System properties windows will open. You need to click on the ‘Advanced’ tab and under ‘startup and recovery’ option, you should click on settings.
- In the list of options, you should uncheck ‘Automatically restart’ and under ‘write debugging information’, click ‘small memory dump (256 KB)’
- In the ‘small dump directory’ box, you should paste this command: %SystemRoot%\Minidump.
- Click ok, and restart your PC.
- After restarting you should run Driver Verifier and chances are you’ve taken care of the problem.
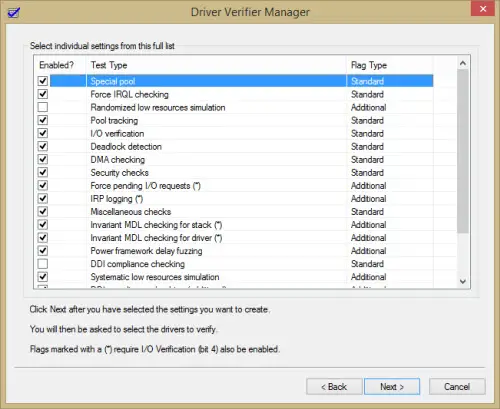
Run driver verifier
These are so far the fixes to critical_structure_corruption in windows 10, if you still can’t get rid of the error you may need to restore your Pc to an earlier version, and if that doesn’t work, you need reset your pc back to factory mode. This will delete all your files and install new windows on your PC. If the problem still persists, it’s definitely due to hardware failure on your computer and have to be replaced before it can work smoothly.
Let us know in the comment section the solution that has worked for or if you want to share a trick that solved the problem for you.
