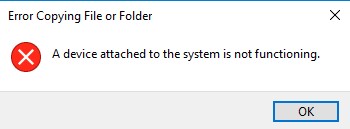
When you connect an external device such as a memory card, USB flash drive, external hard disk, or mobile phone to a computer in order to transfer photos, videos, or music files, an error message pops up, saying “A device attached to the system is not functioning”. You can close the pop-up window by clicking the X button from the top-right corner, as follows:
There’s no need to do anything drastic like reinstall Windows on your computer just yet. In this article, we’ll guide you through the various troubleshooting methods to resolve the connectivity issue that you’re facing with your iPhone and iPad, and the PC. This it is not experienced on the Mac OS and is unique to Windows OS.
What is ‘A device attached to the system is not functioning’ error?
This error means that your computer cannot properly communicate or transfer data with the attached device. You can encounter this error when you connect to PC a removable drive and there might be something wrong with the connection such as driver compatibility or USB port quality, etc. In other words, the error indicates that either the external device or computer needs proper maintenance. However, in some cases, the error also shows up in Windows 10 even though there are not any external devices connected, for instance, you may encounter the error when opening a doc, png, or any other files.
This is not usually regarded as a fatal error, and yet it is rather troublesome, especially when it affects common actions. Are you beset by the error? No worries, this guide will show you how to fix the issue via simple solutions. Just start your way from the first solution until finding the working approach.
Causes of error device attached to the system are not functioning
A device attached to the system is not functioning error can appear because of many factors, the most common ones are listed below:
- The external device is switched off or not properly connected to your computer.
- Drivers of the attached device are incompatible, outdated, corrupted, or faulty.
- The USB port of your computer is not working.
- The USB cable is not functioning properly.
- The application in question is corrupted or damaged.
- The attached external device is physically or logically damaged, such as bad sectors.
- There is something wrong with the operating systems, such as corrupt system files, virtual infection, damaged Windows update files, etc.
How to Fix Device attached to the system is not functioning error
Fix 1: Reconnect the device and use a different USB port
You may encounter this error because of the incorrect connection between your USB storage and your computer. Maybe the connector is not properly connected to the USB port, or the cable you use is defective. You can try reconnecting your device and make sure it is seated firmly on your computer. Then check to see if you get rid of the device attached not functioning error. Or you can try a different USB data cable, as it is often helpful for fixing the error.
It is necessary to have a try reconnecting the device and make sure the USB cable is in good condition and correctly connected. Also, you can try a different USB port, for example, switch between the 2.0 USB port and the 3.0 on your PC. If there are other removable devices attached to your computer, remove them for the moment so as to rule out the connection will not be affected by other devices
Fix 2: Restart your computer
Besides, you can try restarting the computer before trying reconnection or other USB ports, because most of time, rebooting Windows can fix any problems. There might be some incorrectly configured modules or computer installs system updated, which needs a restart to correct errors or implement changes. Remove the device in question before restarting the PC and check if the error disappears after rebooting.
Fix 3: Scan your system with a system file checker and DISM
Step 1: Open System File Checker
- Type Command Prompt in the search bar of Windows 10.
- Select the best-matched one and choose Run as administrator.
Step 2: Type the command
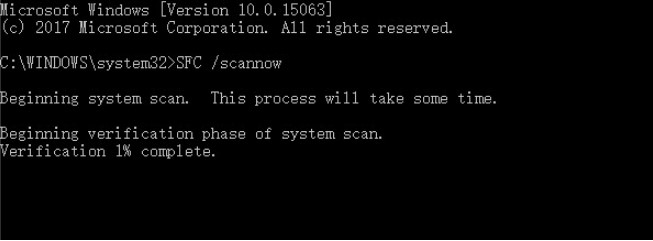
- In the pop-up window, type the command sfc /scannow and hit Enter to continue.
- Please do not close the window until you see the message Verification 100% complete
When the process is finished, you can reboot your computer and check whether “A device attached to the system is not functioning error” is solved.
- Run DISM
The DISM tool (Deployment Image Servicing and Management) also perform an in-depth search on your PC, errors that couldn’t be detected by SFC scan, can be detected with DISM.
- Run Command Prompt by following the steps above for SFC scan.
- You now type this command when Command Prompt open: exe /online /cleanup-image /restorehealth
- Hit enter to run the command, it will now scan for problems on your PC and fix them automatically.
- Restart your pc and after the scan is finished, then check to see if the error is gone.
Fix 4 – Update all your available drivers
Whether you choose to update the device drivers manually, using Windows Update, or you use a trusted third party product, it’s essential that you have the latest correct device drivers for your operating system at all times. If you’re not comfortable playing with device drivers, we recommend using Windows Update in order to update the device drivers manually.
How to update automatically a driver
- Press Windows + X key.
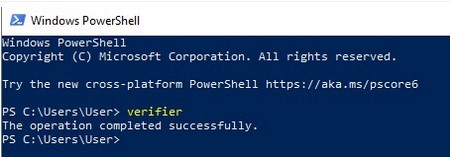
- From the options, select Windows PowerShell.
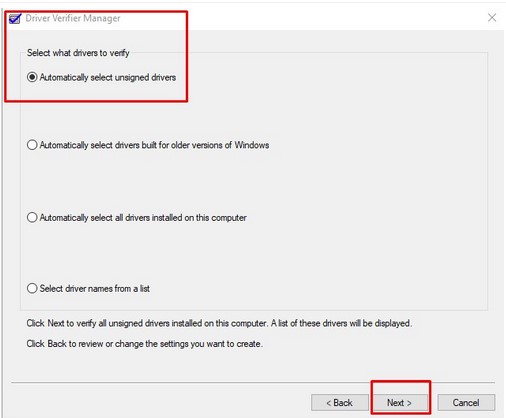
- Type verifier in the elevated PowerShell screen and hit enter, a message will be displayed that says ‘The operation completed successfully’, and the “Driver verifier Manager” will be launched.
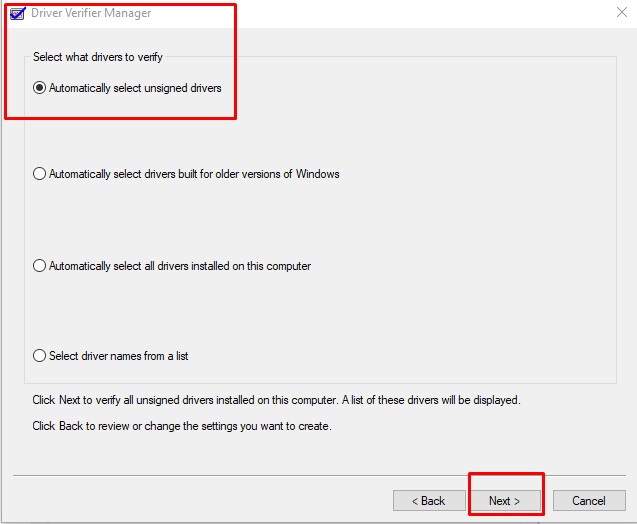
4.When launched, select the option ‘Create standard settings’ and click Next
5.Now you choose the option ‘Automatically select all drivers installed on this computer’, then click on Next
6.After following the steps above, Windows will scan and search errors in all your drivers. After scanning, restart your PC. If there are any drivers with a problem, it will be displayed. You have to fix these errors by yourself, most of the time updating the driver will fix the problem and if after updating, didn’t still work, you can remove the driver and install it again.
Always remember that you can download the driver manually from the official website and install it manually on your PC.
How to update manually a driver
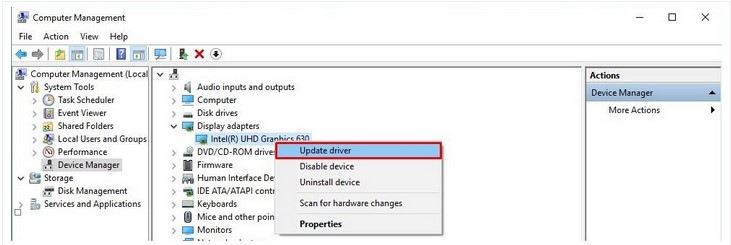
Step 1 – Go to “Search”, type device manager, and choose “Device Manager” from the result. You will see a pop-up with your computer name at the top and a list of devices that are installed on your computer beneath your computer name.
Step 2 – Find and right-click the problematic device and choose “Properties”.
Step 3 – Click “Driver” and then choose “Update Driver”.
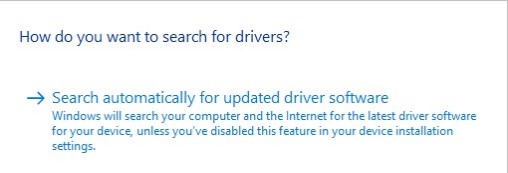
Step 4 – Click “Search automatically for updated driver software”.
Step 5 – After the update, restart your computer
This should fix the problem.
How do you fix the device attached to the system is not functioning error on iPhone?
When you connect your iOS or iPadOS devices to a PC and you are a Windows 10 user you may encounter an error message stating “a device attached to the system is not functioning”. This occurs when Windows is unable to properly communicate with your iPhone or iPad, and there are various reasons why this could happen all of a sudden.
Fix 1 – Install / Update iTunes
Even if you’re not using iTunes to sync or back up your iPhone or iPad, it’s necessary to still have it installed for avoiding issues while transferring photos and videos. If you’re running an older version of iTunes that could very well be the reason for a problem too. So, make sure your iTunes software is up to date by clicking on Help -> Check for Updates.
Fix 2 – Update iPhone Driver on Windows
You can manually update your iPhone / iPad drivers on your Windows PC and see if it fixes your issue. In order to do this, search for device manager in Windows, right-click on your device listed under portable devices and click on “Update Driver”.
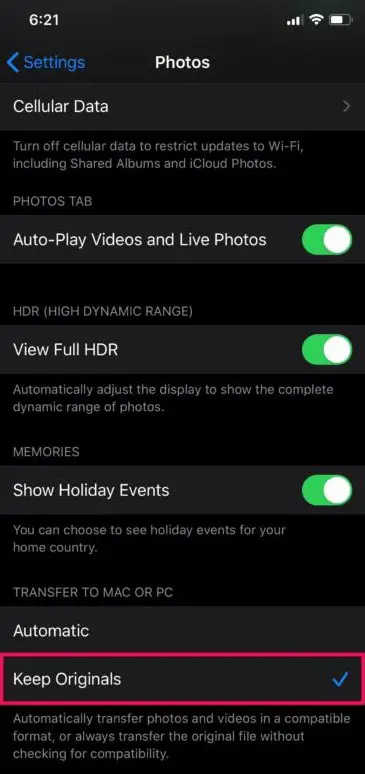
Fix 3 – Set Photos to Keep Originals
With the introduction of iOS 11, iPhone, and iPads by default use Apple’s HEIF (High-Efficiency Image File) format to store photos at reduced file size. During the transfer of this file to PC they convert to the traditional JPEG format. By skipping the file conversion, you could possibly resolve this issue. Head over to Settings -> Photos -> Keep Originals to make sure your device transfers the original files without checking for compatibility.
Fix 4 – Reset Location & Privacy
When you connect your iPhone or iPad to a PC for the first time, you will get a “Trust This Computer” prompt on your device. If you accidentally chose to not trust for whatever reason, it could stop you from transferring photos to your computer. You can reset your location and privacy settings to get this prompt once again when you connect it to your PC. This can be done by going to Settings -> General -> Reset -> Reset Location & Privacy. Then, disconnect and reconnect your device to the computer.
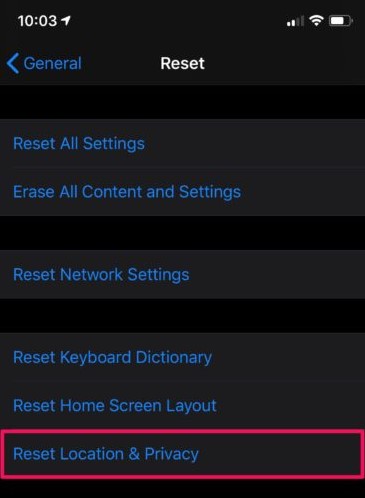
Reset Location and Privacy – Fix the device attached to the system is not functioning error on iPhone
Fix 5 – Update iOS / iPadOS to the Latest Version
Sometimes updating the system software on the iPhone or iPad can remedy errors that are expedient with connecting a device to a computer. Backup the device first, then go to Settings > General > Software Update and installing any available updates.
Conclusion
Windows errors like the one discussed in this guide are really a headache, for it prevents users from performing actions properly on a laptop or desktop. Fortunately, most errors have solutions. The above content covers solutions to a device attached to the system is not functioning error in Windows 10, and we hope they can help you get rid of the issue successfully. We hope you will find this method helpful. Have you managed to solve it? Please let us know in the comments below.
