Whatever the reason you want to change computer name from the command line, Control Panel or PC Settings here’s our step-by-step tutorial showing three different ways how to do it.
How to get computer name from cmd
Before diving into three different ways how to change a computer name from the command line, the first thing you need to know is: how to get computer name?
In your workplace where the same computer can be used by many people or one person may be using multiple computers, it’s important to be able to tell your IT team which computer is experiencing the issue you’re reporting. Although your IT team should be able to walk you through finding this information, knowing it in advance will save you time and solve the problem more quickly. Once you’re familiar with the process, it will only take you a few seconds to locate the name of any computer. Here are three different ways how to get computer name:
Method 1 – How to get computer name from cmd
- Use the search bar in your taskbar and type in Command Prompt.
- Right-click on Command Prompt from the results and choose Run as administrator. If prompted, enter your password.
- Type in one of the commands such as cmd hostname or cmd computer name below and hit enter on your keyboard.
- cmd /k hostname

cmd computer name
- hostname

cmd hostname
Method 2 – How to get computer name from Control Panel
- Open the Control Panel.
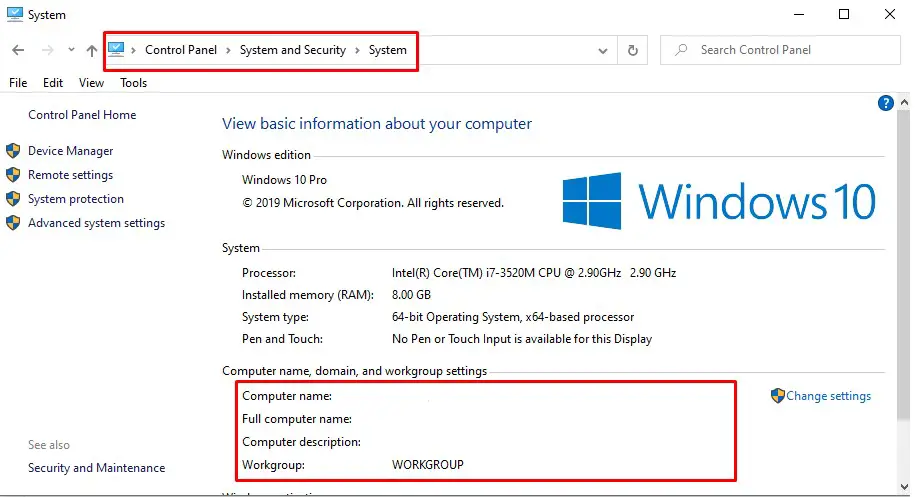
- Click System and Security > System.
- On the View basic information about your computer page, see the Full computer name under the section Computer name, domain, and workgroup settings.
Method 3 – How to get computer name from This PC
- Use the search bar in your taskbar and type in This PC
- Right-click and then click Properties.
The computer name appears under Computer name, domain, and workgroup settings.
How to Change computer name from the command line
Now that you have found your computer name you can change computer name from the command line, Control Panel, or PC Settings.
Method 1.1 – How to change computer name from the command line of your own computer
- Use the search bar in your taskbar and type in Command Prompt.
- Right-click on Command Prompt from the results and choose Run as administrator. If prompted, enter your password.
- Type in the command line the following command and hit enter on your keyboard.
WMIC computersystem where caption='OldComputerName' rename NewComputerName
Note: Replace “OldComputerName” with your current Computer Name and “NewComputerName” the new name you would like to have. After running the command, you need to reboot the computer to make the changes effective. This command works on all types of Windows editions. This command can also be used from a batch file to rename the computer.
Note: If you run it from a normal command prompt, you would get the below error.
C:\>wmic computersystem where caption='xp-pc' call rename windows7-pc

Executing (\\XP-PC\ROOT\CIMV2:Win32_ComputerSystem.Name="XP-PC")->rename()

Method execution successful.

Out Parameters:

instance of __PARAMETERS

{
ReturnValue = 5;
};

C:\>
Method 1.2 – How to change computer name from the command line of a remote computer
Besides changing the name of a local computer, you can also use the WMIC command to rename a remote computer on the same network. For example, if want to rename a remote PC named Alis-Laptop to Tom-Laptop and you know the login credentials:
- Use the search bar in your taskbar and type in Command Prompt.
- Right-click on Command Prompt from the results and choose Run as administrator. If prompted, enter your password.
- Type in the command line the following command and hit enter on your keyboard.
WMIC /node:"Alis-Laptop" /user:Admin /password:password123 computersystem call rename "Tom-Laptop"
The value following /node: indicates the name of the remote computer on the LAN. The value following /user: must be an admin account on the remote computer.
Method 2– From Control Panel
- Open the Control Panel.
- Click System and Security > System.
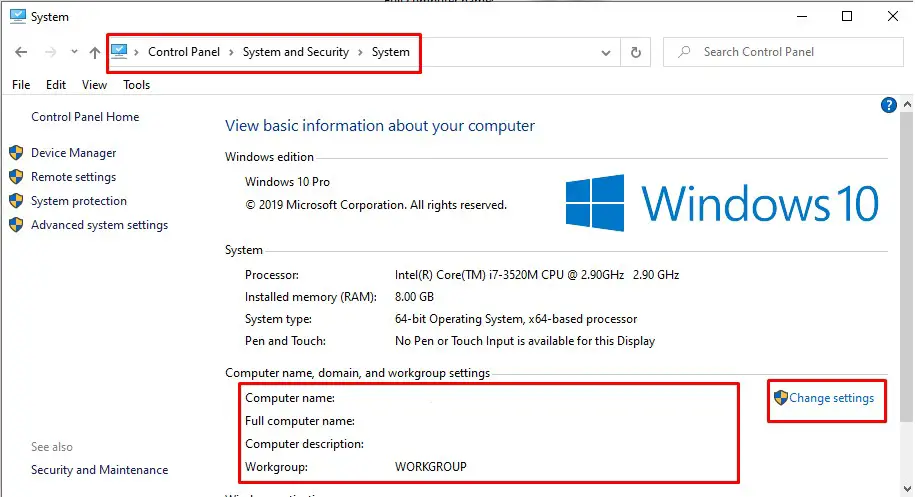
- On the View basic information about your computer page, see the Full computer name under the section Computer name, domain, and workgroup settings.
- Click Change Settings. Note: You need to be an Administrator in order to perform changes.
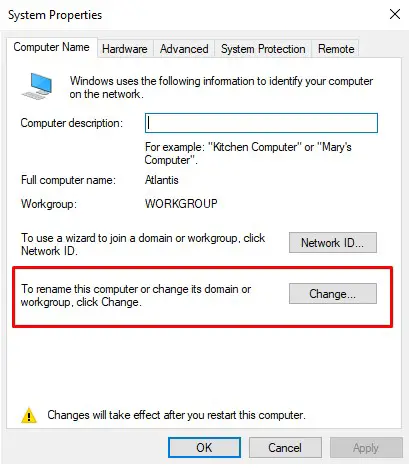
- 5-The System Properties screen will open with the “Computer Name” tab already selected. Click on the Change… button.
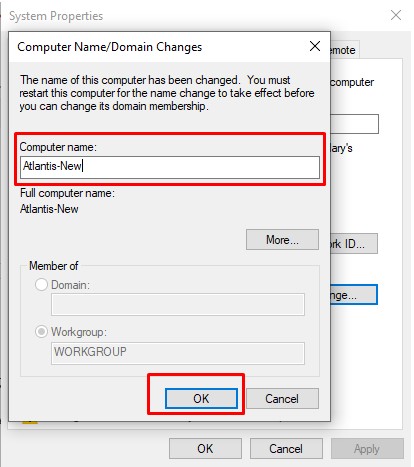
- 6- Now type the new name you want in the “Computer name” box and click OK.
- 7- A restart will be required to complete the name change, and after that, you’re all set!
Method 3– From PC Settings
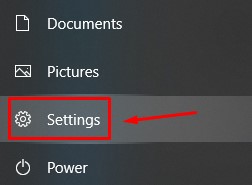
- Click on Start to access the Start Menu. Select Settings.

Settings
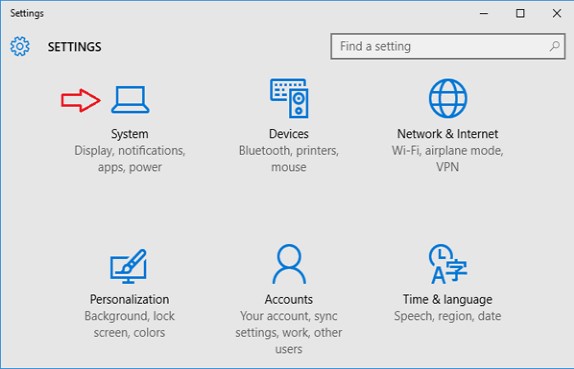
- When the PC Settings app opens, click on System.

System
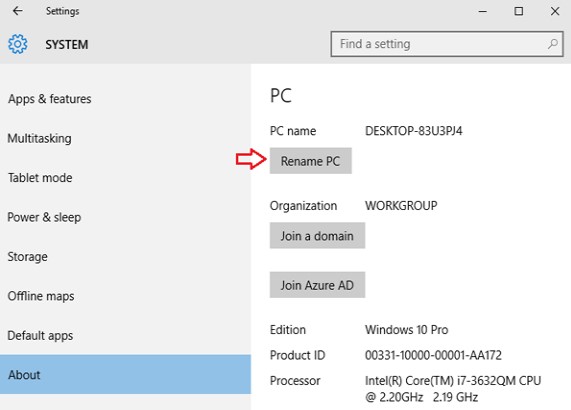
- Go to the About section and then click on “Rename PC“.

Rename PC
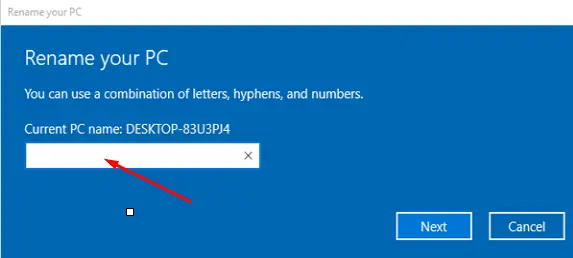
- Type the new name you want to use and click on Next.

Rename PC
- You will be prompted to restart your PC to apply your new settings, click on Restart Now to proceed.
Conclusions
Dear followers of Get IT Solutions, these are all the methods of how to change a computer name from the command line, Control Panel, or PC Settings. We hope you will find this method helpful. Have you managed to change it? Please let us know in the comments below.
