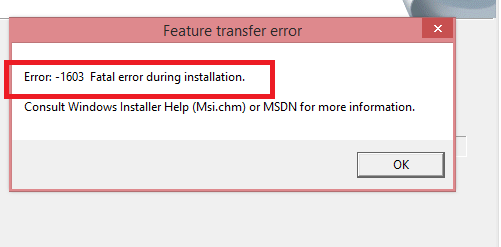
The error 1603 is a general code that shows there is a problem with your Windows installation, and it’s displayed by the Microsoft Installer Engine. MSI package formats are used to install or remove the software. When Windows fails to install the software as it should be, the user will end up with error 1603. The error message displayed is “1603 Fatal Error During Installation”.
Understanding Error 1603 Fatal Error During Installation
What Are The Causes Of Error 1603 Fatal Error During Installation?
- Windows installer is trying to install an app that exists on your PC.
- Windows Installer wants to replace a file that’s currently used by another program.
- Windows installer service isn’t installed correctly or has not been started.
- Corrupt setup or Windows installation wasn’t completed.
- The user account doesn’t have permissions on the folder they want to install the windows installer package.
- The Windows temp folder is full.
- The Install Shield Developer used is outdated.
- The folder you want to use for installing the “Windows Installer Package” is encrypted.

Error 1603 Fatal Error During Installation
These are some of the major causes of error 1603 fatal error during installation on your windows device, as already stated, it’s a general error and that means it can show up for so many reasons. Let’s now take a look at the fixes to this error.
How To Fix Error 1603 Fatal Error During Installation
Close all background Apps
Software running in the background can prevent Windows Installer from installing programs, and by closing the apps running in the background you can get rid of the error fast. You can locate programs running in the background by opening the task manager. To open task manager, you should right-click on taskbar, and you’ll see “Task Manager” from the context menu, you can also press Windows + X keys to launch Task Manager directly.
Click on the Processes Tab, you should close every software that’s under apps by clicking on the program and then select “End Task”. You now check for the error to see if it’s fixed.
Check to ensure the program isn’t already installed
It can happen that you have the program installed on your PC, this happens when you a lot of programs installed on your PC that you don’t normally use, and for most of them you’ve forgotten that they’re already installed. You should go through your “programs” folder, or any location where you normally install your programs, by default though it’s the “programs” folder for most applications. Once you find it’s already installed, you should Open Control Panel and click on “Programs and Features”. Locate the program and right-click to “Uninstall”. Then you can attempt to install the new program.
Make sure you have enough space on your Hard drive
Every application comes with the minimum space requirements, including Hard Disk Space and RAM, you need to check and see whether your PC has met the requirements. It can be possible that your hard drive is almost full, open File Explorer and locate the hard drive you’re trying to install the program which should be located by the left pane of Windows Explorer. Right-click on your drive and select “properties” from the context menu, you can now see the available space, if it’s almost full, you should free up more space to accommodate your installation.
Delete temporary files in the Windows Temp folder
The next thing to do now is to erase temporary files using Disk Clean up tool, there are of course other methods, but using the disk clean up tool is faster. Here is how to do it.
- Search for “Disk Clean Up” in the Windows search, it will show up in the list of options, click to open it.
- Click on C: drive from the menu and hit ok.
- You can view the details of the info that will be cleared.
- You can check the boxes for the data you want to be erased, you should make sure that “Temporary files and Temporary Internet files” boxes are checked. You can also select other files you believe aren’t useful to you.
- Click OK and then the “Delete Files” option.
- You have now cleared temporary files and there is a chance the error is gone.

Delete windows 7 and 10 temp files
Use Microsoft Fix it a tool
This simple Microsoft tool has proven to fix the error 1603 fatal error during installation with a few clicks.
- Download Microsoft Fix It tool.
- Locate the download and click to install.
- When the installation finishes, you then run the program on your PC.
- This tool will fix the “1603 fatal error during installation” right away.
- You can now continue with your installation to see if the error is removed or not.
Change the location of your Installation
If you choose a destination that doesn’t exist, you’ll end up with the 1603 fatal error during installation, and changing the installation folder will help you fix the problem if that’s the case. It might all be possible the folder is encrypted and hence won’t support your installation either. Changing the installation destination for the program you’re trying to install will fix the problem for you.
Restart Windows installer service
We’ve already stated that when the Windows installer service isn’t running, the 1603 fatal error during installation is bound to show up, even if it’s running, we need to Restart it. Here is how to do that:
- Open the Run dialog by pressing Windows + R keys.
- Then you type msc in the box.
- Press enter to open the Services Manager or just click OK.
- In the list of services, you should locate “Windows Installer Service”, when you follow alphabetically, it’s at the button, you can also use the search box to locate it.
- You now right-click on “Windows installer service” and select “Properties” from the context menu.
- You can now see whether the service is running or not, if it’s not running you should click on the “Start” button to start it. If it’s already running, you should right-click and click on the option “Restart”.
- Restart your PC and proceed with your program installation to see if the error 1603 fatal error during installation is removed or not.

Restart Windows installer service
Register Microsoft Windows Installer Service Again
Open Command Prompt, for Windows 8 and 10 you can see it by right-clicking on start and you’ll see the option “Command Prompt (Admin). Select that to launch the Command Prompt Windows. Alternatively, you can type cmd in windows search and right-click, select the option “Run As Administrator”.
You now run the four commands listed below, you’ll run them one by one. That’s, you copy one command, paste it, and then hit enter. When it finished running you then copy or type the second command, that’s how you do for all the commands. Here are the commands to run.
%windir%\system32\msiexec.exe /unregister
%windir%\system32\msiexec.exe /regserver
%windir%\syswow64\msiexec.exe /unregister
%windir%\syswow64\msiexec.exe /regserver
After running all the commands, you should restart your PC.
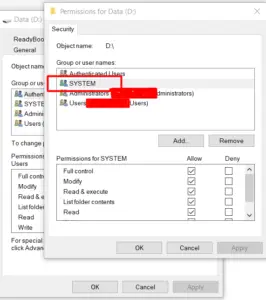
Provide permissions on the drive
When you don’t have full control permissions the MSI error 1603 can arise and that’s why you need to grant permissions if you’re still not able to fix the error. Here is how to provide permissions:
- Open Windows File Explorer.
- You can now see all drives connected to your PC by your left, right-click on the drive that has installation file location, and click on “Properties” from the context menu.
- On the Window that opens, you should click on the “Security” Tab.
- Then you click on the “Edit” button.
- Under “Permissions”, you should click on the ‘System” button.
- You should check the option “Allow” that is next to the “Full Control” option.
- Click Apply and then Ok for the changes to take effect. We’ll have to do this even for the PC administrator.

Provide permissions on the drive
- You now go back to the “Properties” Window as you did above, and click the “Advanced” button.
- Next, you click on the button “Change Permission” button.
- On the “Permissions” Tab, you should double click on “Administrators”.
- Then you select “This folder, subfolders Files” from the “Applies” in the menu.
- You should also check all the permissions applicable and then click Ok.
- You should follow these steps for “SYSTEM” also and click ok.
- You have now provided full permissions for accessing the drive and if that’s the cause of the error, it will be fixed.

Provide permissions on the drive
Edit NtfsDisable8dot3NameCreation registry value
The MSI error 1603 can show up when File Name Creation has been deactivated, enabling can help us get rid of the error. Follow these steps:
- Open the Run dialog by pressing Windows + R keys.
- Type “regedit” and hit Enter or click OK.
- The registry editor window will open, and you need to navigate to this path: Computer\HKEY_LOCAL_MACHINE\SYSTEM\CurrentControlSet\Control\FileSystem
- Locate and double click on NtfsDisable8dot3NameCreation DWORD.
- This will open the Windows to edit the DWORD (32-bit), if DWORD’s value is 1, you should change it to 0.
- Press OK to close the window and also close the registry editor.
- Restart your PC and check the error to see if it is cleared.

Edit NtfsDisable8dot3NameCreation registry value
Those are all the steps to troubleshoot MSI installation error 1603. Let’s hope that you fix it.


