Set default printer command line using different ways may come to you in handy. Using this method you can print your documents more quickly. This tutorial can help you in those situations where you do have multiple printers in your home or office and you want to select the default one. There are multiple ways set default printer and we are going to show you how to do it. Please read the post below.
Method 1 – Change default printer via Print dialog
Step 1: Open Microsoft Office Word or Notepad software.
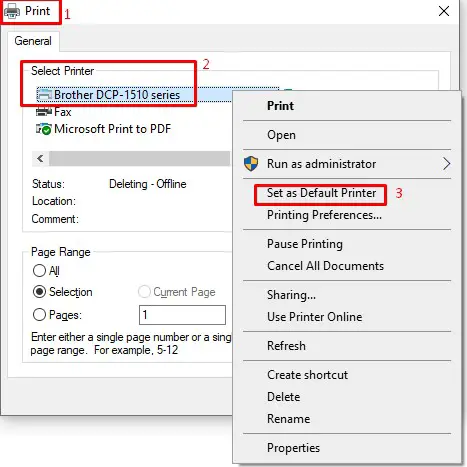
Step 2: Click the File menu and then click the Print option to open the Print dialog. Also, you can use the shortcut Ctrl + P to open the Print dialog.
Step 3: Once you are here, right-click on the printer that you want to set as the default printer on your Windows 10 PC and then click Set as Default Printer option.
Step 4: Click OK button to set the selected printer as default.
Method 2: Use the Windows Settings to set default printer
Step 1: Press the shortcut by using Windows logo key + I together and click Devices.
Step 2:Select the Printers & scanners tab and click the printer you want to set as default. Click Manage.
Step 3:Click Set as default.
Step 4: You need to make sure that you need to stop Windows 10 from automatically managing your default printer. Turn back to the Printers & scanners tab and make sure you did NOT check Let Windows manage my default printer or you can simply turn off the Let Windows manage my default printer option.
Method 3: Set Default Printer Windows 10 via Control Panel
Step 1: Open Control Panel by typing the function name in Cortana’s search bar and then clicking the result.
Step 2: Select Devices and Printers on the window of Control Panel.
Step 3: Under the Printers section, right-click the printer you want to set default on Windows 10 and then click Set as default printer.
Method 4: Set Default Printer Command Line
Step 1: Run Command Prompt as administrator.
- Type Command Prompt in Cortana’s search bar,
- Right-click the most-matched item and then select Run as administrator from the menu.
Step 2: In order to get the list of all the printers installed on your machine, on the Command Line window, type the following command and then press the Enter key to run this command.
wmic printer get name,default
Step 3: Get default printer name by simple copy-paste
Step 4: Set default printer command line by typing the following command and then press the Enter key to run the command
wmic printer where name='yourprintername' call setdefaultprinter
Method 5: Set default printer using Registry editor
Step 1:Press the shortcut by using the Windows logo key + R together to open the Run box.
Step 2: Type regedit and Run as Administrator and press Enter.
Step 3: Navigate to “Computer\HKEY_CURRENT_USER\Software\Microsoft\Windows NT\CurrentVersion\Windows”. Alternatively you can simply copy and paste the text into the Registry Editor address bar and press Enter to go there directly.
Step 4: Double-click LegacyDefaultPrinterMode file and change the Value data into 1. Then click OK.
Method 6: Let Windows Manage my Default Printer
Step 1: Press the shortcut by using Windows logo key + I together and click Devices.
Step 2:Select the Printers & scanners
Step 4: Check the box with the option Let Windows manage my default printer option
Final conclusions
Dear followers of Get IT Solutions, in our step-by-step tutorial, we have provided all the possible methods on how to set default printer. We hope you will find this method helpful. Have you managed to solve it? Please let us know in the comments below.


