In this article we’ll talk about different ways on how to windows flush dns and clear dns cache on windows 10. Also we will see different commands regarding OSX flush dns and linux flush dns. DNS stands for Domain Name System. It translates website names into IP addresses which computers can understand. This happens for every website you want to visit. Every time a user visits a website by its hostname, the web browser initiates a request out to the internet, but this request cannot be completed until the site’s name is “converted” into an IP address. Windows comes with an option which stores the specified DNS server address to speed up browsing experience.
Flush DNS in Windows 10
Why do you need to Flush and Clear DNS Cache
There are many reasons why you may need to flush your DNS in Windows 10, the most common one being that websites aren’t resolving correctly and it may be an issue with your DNS cache holding an incorrect address. Also, reset DNS cache can be useful after changing the DNS settings on the computer or router, and also in cases when the desired site has changed the IP address to another (after moving the site to another hosting provider), and you still have the old IP in your cache and so the site just does not open.
The described methods in our article of Windows flush DNS cache works in all versions of Windows from Windows XP, Windows 7 to Windows 10.
How to see your current windows DNS Cache
To see your current Windows DNS Cache, open a new elevated command prompt instance and type the following command: ipconfig /displaydns
The command will produce a very long output or you can redirect command very long output to text file for examination by typing the following command: ipconfig /displaydns > C:\Windows\dns_cache.txt
The output can be found on the following path: C:\Windows. Then you can open the dns_cache.txt file created and inspect its entries.
Windows Flush DNS Cache, Method 1 – Windows Command Using ipconfig /flushdns
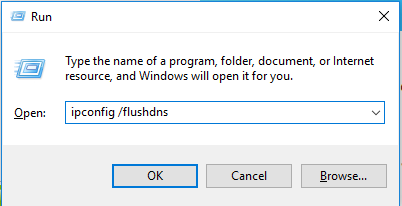
- Hold down the Windows key and press “R” to bring up the Run dialog box.
- Type ipconfig /flushdns then press “Enter“.
A command box will flash on the screen and the DNS Resolver cache is cleared.
Windows Flush DNS Cache, Method 2 – Command prompt
- Click on start menu search and type ‘command’.
- From search results right click on Command Prompt (make sure you’re running it as administrator).
- Type ipconfig /flushdns and hit enter.
If everything went well, the result should be “Successfully flushed the DNS Resolver Cache“. This means that cleaning the DNS cache was successful.
Note: Flush DNS Cache can be done even using Windows PowerShell:
- Select the “Start” button, then type “powershell“(make sure you’re running it as administrator).
- Select “Windows PowerShell“.
- Type Clear-DnsClientCache, then press “Enter“.
Windows Flush DNS Cache, Method 3 – Reset of Winsock settings
Another way is to perform a reset of Winsock settings.
- Click on start menu search and type ‘command’.
- From search results right click on Command Prompt (make sure you’re running it as administrator).
- Type netsh winsock reset and hit enter.
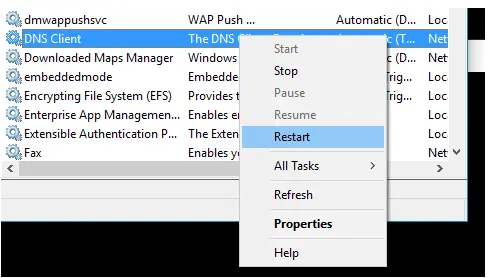
Also you can restart the DNS client service to clear the cache. You can perform this task from services.msc console. Right click on DNS Client service and select Restart option.
Troubleshooting Windows Flush DNS Cache
If after running the command ipconfig /flushdns you receive an error Could not flush the DNS Resolver Cache: Function failed during execution, most likely the system service “DNS client” is disabled.
Run this service or restart it (in case of errors when the service is in running state).
OS X Flush DNS
For Mac and Linux lovers the commands to flush cache are slightly different depending on the version you’re running. If you are a network administrator, web developer or a system administrator of Mac, you may have to flush DNS cache on macOS for quite a few reasons. Especially, if you want a name server to resolve rightly or a change in DNS address to be detected by your individual system.
Besides the above reasons, if you have altered the /etc/ hosts file and you need the modifications to take effect minus rebooting the Mac, then you may find it necessary to dump and reset DNS caches. Resetting DNS cache is not the same in each version of Mac OS X. If you are a Mac user for a longer period, you may know that this process in OS X Yosemite is similar to some other older versions. This is probably due to the discoveryd replacing mDNSResponder, and then switching back to mDNSResponder yet again. Despite the change, flushing DNS cache remains a terminal command in Yosemite, but there is a little different depending on the exact version of the OS you are using. You get to clear either Unicast DNS or Multicast DNS, or both. If you are attempting to reset all DNS caches on the Mac, then you may have to consider clearing both as a proper measure.
Flush DNS on different OS X Version
First, make sure you’ve opened up your terminal on your computer.
- Go to Applications -> Utilities -> Terminal
- Type the following command and press Enter
OS X 12 (Sierra) and later
macbook$ sudo killall -HUP mDNSResponder;sudo killall mDNSResponderHelper;sudo dscacheutil -flushcache
OS X 11 (El Capitan) and OS X 12 (Sierra)
macbook$ sudo killall -HUP mDNSResponder
OS X 10.10 (Yosemite)
Versions 10.10.4+
macbook$ sudo dscacheutil -flushcache;sudo killall -HUP mDNSResponder
Versions 10.10.1, 10.10.2, 10.10.3
macbook$ sudo discoveryutil udnsflushcaches
OS X 10.9 (Mavericks)
macbook$ dscacheutil -flushcache; sudo killall -HUP mDNSResponder
OS X 10.7 (Lion) and 10.8 (Mountain Lion)
macbook$ sudo killall -HUP mDNSResponder
OS X 10.5 (Leopard) and 10.6 (Snow Leopard)
macbook$ dscacheutil -flushcache
OS X 10.4 (Tiger)
macbook$ lookupd -flushcache
Linux flush dns
Most current Linux distributions do not use a DNS resolver cache in the same way that Windows and Mac OS X use. To confirm which particular daemon is installed for your Linux distribution, check the website or its forum pages.
However, a common DNS caching application sometimes used is the Name Service Caching Daemon (nscd). It’s most likely not installed by default so there is no need to flush the cache. But, if you’ve already installed it you can flush the cache on linux by running the following command in a terminal:
[local]$ sudo service nscd restart
Alternatively, you can try these commands:
[local]$ /etc/rc.d/init.d/nscd stop
[local]$ /etc/rc.d/init.d/nscd start


