If you’ve received the error “you must enable system protection on this drive” on Windows 10 or any other version of windows especially window 7 and 8, you’ve probably tried to restore your PC from an earlier date. As the error message says, you need to enable system protection in order to proceed with the system restore.
There are a couple of ways to enable system protection and that’s what we’ll share in this post. Also there are ways to ways to restore your pc without enabling the system protection feature. We’ll share useful information in this article that will help you solve the problem of enabling system protection on your PC.
You Must Enable System Protection On This Drive
What Is System Protection?
This is a windows service or function that deals with creating and storing information that’s related to registry and system files. It’s responsible for saving your previous files you’ve modified and then save them so that you can recover them if the need arises, like in the case of system restore.
System protection is already enabled by default the moment you make new windows installation, with the exception of Windows 10. This service also doesn’t work on all type of drives. It can only be enabled on NTFS drivers. If that’s not your drive, you’ll end up receiving “you must enable system protection on this drive” over and over again, you just have to find another way to do system restore without enabling the system protection feature.
What Are The Causes?
Whenever you receive the error “you must enable system protection on this drive” it means system protection has been disabled, and you have to enable it. One of the reasons for such to happen is that your drive isn’t supporting the system protection enable feature, and secondly corrupt registry and system files might change your settings to disable the system protection feature.
let’s go ahead share how to enable system protection feature.
First Method: Using CMD
This is so far the fast method since you just need to type some commands and system protection will be enabled. Here are the simple steps to do that:
- Open your command prompt. You can do that by typing cmd in windows search, right-click on and select “Run as administrator”.
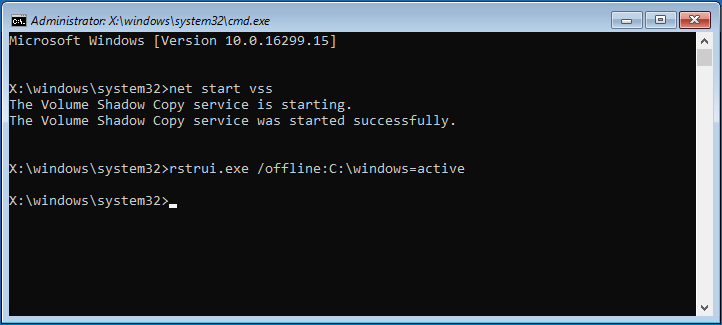
- When the command prompt open, type “Start Vss” and hit enter to run this command.
- The second command to run is “exe /offline:C:\windows=active”. You should also hit enter to run the command.
- After running the command, you should now restart the computer. By now the system protection should be enabled.

You Must Enable System Protection On This Drive
Second Method: From Control Panel
- Open control panel on your PC
- Click on “System and Security”, then “system”, and select “System protection”.
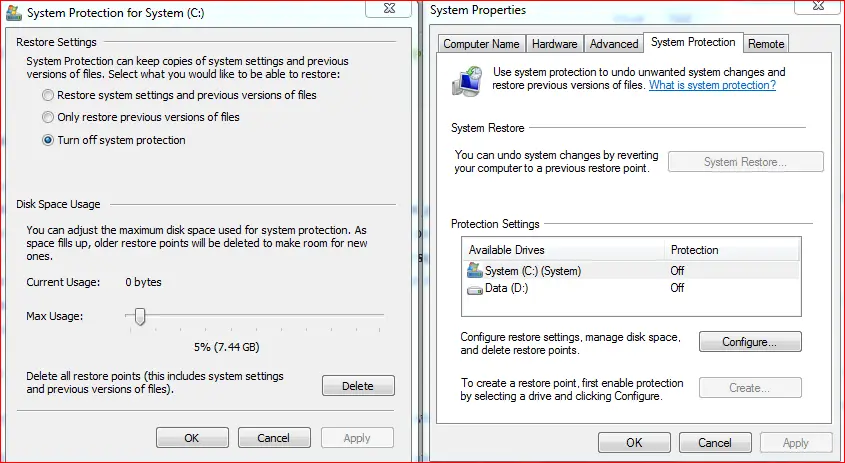
- You’ll have the option to select your drive, normally it’s C: you now click on Configure.
- From Restore settings, you should enable the option that says “Restore system settings and previous file versions”, this is for windows 7. For Windows 10 you need to select the option that says “Enable system protection”.
- Click apply and then ok for the changes to take effect.

Enable System protection
Third Method: Using PowerShell
Using a simple PowerShell command, you can restore your system protection with ease.
- Open PowerShell tool, you can do that by right clicking from start menu and then select Windows PowerShell (admin) from the options.
- If PowerShell didn’t show up, you can type its name on Windows search, right-click on it and run as administrator.
- When the PowerShell console opens, you should type the following commands in it, and hit enter after each command.
Enable computer recovery – c:\ drive
vssadmin resizes the shadowstorage /on=c : /for=c : /maxsize=5%
Checkpoint Computer – Description “Done”
Read Other Windows Helping Guides:
Conclusion
These are just some of the methods you can follow to enable system protection on your drive. If you’re still not able to use system restore, it means there are some settings you need to configure with system restore. You should attempt to do system restore by running your pc on safe mode, and if that doesn’t work, you should completely reset your PC settings from startup. This will keep your files and also reset Windows to its original settings. If there are any wrong settings causing the problem, it can be fixed right away by resetting

